In which I blog about my miniature wargaming and whatever else takes my interest!

In which I blog about my miniature wargaming and whatever else takes my interest!

Sunday, July 30, 2017

Battle at the Tower of Echthalion

Had the chaps over Saturday for a game. The objectives being to roll dice and put my new terrain and trolls on the table. I like a natural looking table and often try and build as interesting a table as I can which will then point me to a scenario. So my village and new grain fields were at one end and the new hills were at the other. Beyond the hills from the village was the ancient well and statue, a relic of ancient Numenor or perhaps some fallen Elf Kingdom? Obviously a source of curiosity for the local children (warned away by stories of faeries snatching errant youngsters no doubt) and a place for lover's trysts.

The Uruks and trolls made a nice 48 point force. My new trolls I organized into four 2 figure units of Bellicose Foot with shiny armour. The Uruks were four units of light foot with missiles. There was also my unit of four smaller trolls, acting as more bellicose foot. Their objectives were to burn the village, secure the crossroads and capture the ancient watch tower.

For the Forces of Light I deployed Naleth the Wise (elite foot plus wizard) with two units of Elven archers (light missiles with sharpshooter upgrade) and decided to use some men for a change. The troops from the Kingdom of Arnor had two units of elite riders, one of heavy riders, two units of heavy foot and one of scouts (all pulled from my early Feudal/Norman/1st Crusades troops).

I didn't take any pictures during the game but restaged a few key moments after wards.

The trolls died spectacularly. Their bad defensive rating means that charging in is the best way to deal with trolls if you've got elite riders. A unit of heavy foot had quite an evenly matched tussle with one pair of trolls near the village as they bashed each other back and forth through the grain field. Elf archery rather tied down one flank in the hills. One company of knights charged down the road into some trolls and uruks. The trolls were routed and the uruks pushed back. In the centre the heavy foot and scouts pushed through the village and fields to hold off more uruks and trolls. Meanwhile the other unit of knights and the sergeants swept around the far side of the village.

Angmar on the march!

Village

Other view

Knights crash into trolls and then the uruks. They eventually broke but not after securing the crossroads

Elves aided by Naleth's magic shoot up trolls and support the knights

Fighting around the village. Scouts use their javelins to keep uruks at arms length and help the heavy foot fighting the trolls in the grain fields.

Sergeants (red banner) took on uruks and were destroyed. Knights bundled the trolls back across the field until they fled

Elf archers win the race to the top, but never loosed a shaft. Once the elves were in position the uruks below slunk off through the woods, the last evil unit left on the field.

Tactical lessons, knights working with heavy foot and archers are really effective. Also don't lead with the trolls. Send them in once the uruks have softened up the enemy with a combination of archery and spear fighting. Also take advantage of the trolls abilities and maneuvering in rough ground to avoid the knights and elven archers.

Wednesday, July 26, 2017

Cheap Trolls

The armies of the Necromancer have been lacking heavy hitters and every self-respecting evil warlord needs trolls. Big, tough, scary, handy for smashing things or pulling siege engines. The Games Workshop trolls fit my aesthetics but not my budget, being ridiculously over priced.

However, the very talented Simon on his Iron Mitten blog used some very economical plastic "1/72nd" scale "Battle Trolls" made by a Ukrainian company called Dark Alliance. They aren't that much smaller than the GW trolls and 1/20th the price! I found a box on eBay for £10 with only £1 shipping. So that came to Cdn$18.80-something for 8 figures, which is a lot better than other options.

So a couple of weeks later, these show up:

Two each of four different sculpt. Lots of nice details with the straps and buckles keeping the armour on including cloth under the arm pieces to prevent chaffing. The skin is nicely done and made me think of scaly elephants or rhinos. Sadly there was a lot of flash which even with a sharp blade was hard to remove, so I'll be avoiding close-ups on these.

Of course, now that I've finished I had the thought of using a pair of fine, slightly curved scissors that I have from a job I had 15 years ago trimming flash from rubber auto parts.

After gluing to washers and priming, I painted them the same way as my Vendel trolls: brown base coat, Vallejo khaki grey skin, and other colours blocked in then a wash with brown ink.


Because their bases are bigger, and to disguise the steep break between the figure base and the washer I added some tufts of dead grass.

I'm going to initially try these as two figure units of bellicose foot with shiny armour. Maybe give them a cause fear too? Or I could have a lot of lesser warbeasts!

But here they are in a photoshoot trampling my new grain fields.


Can't wait to get these in a game.

Saturday, July 22, 2017

Dreams of Fields

My medieval village has been lacking grain fields as well as animals. I've been admiring those lovely ones made from coir mats. To that end sometime last year, I ordered a big coir mat from Amazon having had no luck finding any in hardware or housewares stores.

Now I should have ordered a rubber backed mat that could just be cut apart, based and given a bit of flock around the edges. But I got the "100% natural" mat, which turned out to be quite thick with the coir stitching holding it all together.

Very thick and that edging won't do

With edging removed

Chunk of mat, still too tall
So nothing for it but to remove the tufts, trim an end flat and stick them in glue. My medieval farmer with his scythe is helping me with the scale.


Occasionally pushing everything down and compressing the clumps together seems to help. Having a pile of tufts pre-trimmed also helps. With a large base you need to work in sections.

Once everything was glued down and set, I painted the base brown and then flocked around the edges. On the one base I did a bit of cut or trampled grain. That got some sand which was dry brushed a lighter brown before trimmed fibres got glued over top.


Very laborious, but looking good in the end. I've barely touched the mat so I can make loads more some other time.

Monday, July 10, 2017

Renovating Weathertop

The observant among you will have noticed that I've been using this Games Workshop hill a lot:
I would never buy an overpriced Games Workshop terrain piece. I actually got it for free because some one's cat had clawed at the flocking. It was pretty simple to repair. But I like it, the jutting stones are suitably dramatic and fit my mental image of New Zealand Middle Earth.

 I do have other hills however. I made these hills many years ago:

As you can see I made them by folding grass paper over expanded polystyrene. The big conical one was the base of Mrs. Rabbitman's and mine wedding cake actually, which gives you an idea of how long I've had it. As you've probably figured out by now, the slopes are way too steep and both hills are rather unusable. So big dramatic hills like Weathertop have so far eluded me.

Ripping the grass paper off and hacking into the slopes would reduce the size of the hills to an unfortunate degree. Fortunately I'm a cheap bastard and didn't throw away these big hunks of foam.

Then I thought "Hang on, how about gluing chunks of off cuts onto the slopes" because again I'm a cheap bastard, and have a couple of boxes of off cuts from my NW Frontier hills.

Like this:

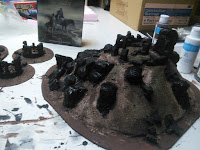
An extended evening of carving and gluing chunks of foam gave me this:


And this:


After sitting for 24 hours I expended a tube of caulking filling in all the cracks, gaps and crevasses. I then liberally scattered the gritty mortar that comes with the bricks over the wet caulk.

In front of the building toy that provides the mortar, arches and curved bricks


The mortar is supposed to be mixed with water so I misted everything with a spray bottle and surprisingly little shook off after they sat and dried for 24 hours. The grit helps the chunks of foam blend into the ground better.

To help the grit stick even more everything got a good coating of watered down burnt umber and then all the rocky bits were liberally splashed with black.


Then I dry brushed tan over the brown and successively lighter shades of grey over the stones.

I suppose I could have stopped here and called it a bit of Mordor?


To flock these big pieces, I painted the glue on in wedges and poured the flock on before it could dry before moving onto the next wedge. 

Flocking in process
After letting the glue dry overnight and then knocking off the excess, it was time to add flower tufts, grass tufts, clump foliage, bits of dried lichen and clumps of long grass to add some variety and interest. I think I used just about everything in my scenic basing stores. I tried to be mindful of where figures would stand and keep those spots clear. One thing I realized with the Army Painter flower tufts is that they peel off in some large irregular shapes which are nice for doing flowers spilling down a hillside or over a rocky edge.


I also did a couple of ancient wells while doing the hills to help set the mood. I'll keep one and give the other to the Mad Padre.

The Well of Tears, Mk. 1 and Mk. 2

Now to see how they look with troops fighting over them:
This looks like a good spot for a heroic stand, as Elven Kings are wont to do.


There is room for a 12 figure unit to squeeze on, honest.

Bit more room on the ridge


This side definitely needs archers

I'm feeling pretty pleased about how they came out. The oval hill has a minor warp, but not enough to be a nuisance once it's placed on the felt.

I think my next game will involve some very hilly terrain!