In which I blog about my miniature wargaming and whatever else takes my interest!

In which I blog about my miniature wargaming and whatever else takes my interest!
Showing posts with label Game Design. Show all posts

Tuesday, August 26, 2025

Beetle Jousting

Ok, OK, hear me out... 

Quar beetle jousting!

I was watching Mogsymakes dive into the new game from Osprey, Hairfoot Jousting.

Hairfoot Jousting cover. 

And thought "This looks fun."

Then I immediately thought "This would be really fun with Quar!"

Creevin Trench Watch cavalry are coming along. It might be easy enough to put them on assorted large bugs. And as long as the uniform doesn't change too much with the plastic release, these could work nicely:

Creevin trench watch. 

The cavalry wear the same uniform. Now just put them on a variety of mounts and replace rhyfles with lances. 

Gruuk the Watch Beetle and Farmer Bayglen from the Zombiesmith store

Prebyg bug from Zombiesmith MyMiniFactory 

Ganga beast -from Zombiesmith MyMiniFactory 

A couple still on their cadiers would be fun too. Hopefully the Creevin cavalry come in a box of 6. Two teams of 3 is all you need for the game. 

So... there's a new project. Sigh.

Saturday, August 2, 2025

Airstrike!

Colonel Crown Princess Gretchen stood in the briefing room with the other pilots, the tension quivering around them like an electric field, listening to the Operations officer and Intelligence officer brief them. Weather, communications, route to target area, expected enemy forces, threat assessments, targets. 

This was it. This wasn't a training exercise anymore.

Second strafing run.

The recent Tartarian attack had ruptured the front. A column of their new Soviet supplied armour was thrusting at a key bridge that the Queen's Liebgard Husaren Battlegroup was fighting desperately to hold. As the inhaber of the Liebgard, Gretchen felt especially anxious. There were probably men dying right now whom she had personally pinned medals to or eaten with in their Officer's Mess.

The IO stopped talking. Everyone was looking at her, their commander. Poise is everything, liebling. She heard her father say. Even if inside you're screaming in panic, always look calm. They're depending on us to do that.

She cleared her throat. "This is what we've trained for. We know what to do. Let's go bust some Tartar tanks!"

The anxiety lifted like a leaf on the wind as the pilots eagerly ran to the flight line. Helmet on, mic plugged in, Oliver, her Crew Chief, personally buckled her harness and closed the canopy after wishing her good hunting. The Marshaller waved her onto the runway and gave her the thumbs up. Pushing the throttle forward she hurtled past hangers, antiaircraft guns, blurring pine trees and was suddenly airborne.

She circled, letting the rest of the sortie get airborne and form up on her. Then they turned and headed to the Front. 

Dangerous skies!

Flying around the shoulder of a mountain she could see the battlespace ahead, columns of oily smoke from burning tanks. 

"Falcon Leader to Badger. Incoming. Mark targets."

"Enemy east of town. Several big columns."

Mantovian Battlegroup taking positions

Combat Team Commander blown up early!

She looped around and looked down to see the bridge, the town, some tanks were burning in the streets. To the east masses of dark green beetle shaped tanks were advancing. 


"Falcon Leader to Falcon Flight. Weapons hot. Engage."

Her wingman rolled and banked, pulling ahead of her to make the first strafing run. A tank with twin AA guns turned to fire at them, Rudi jinked to avoid the fire, his rockets and shells kicked up a lot of dirt but otherwise missing. 

First strafing run

Gretchen followed, her butt pressing into the seat with the slight G-force from the maneuver. The ZSU they'd been warned about tried to track her, she ignored the 57mm shells whizzing past her canopy. Calmly, just like in training in Canada and America, she lined up on the same row of tanks and pushed the firing button. 

ZSU-57/2

Rockets flew from her wings. A row of explosions erupted along the target. A big fireball erupted lifting a round turret high into the air. 

Second strafing run. Rolled much better this time.

As she circled around she saw a MiG-15 swooping in on the bridgehead. But a silvered J29 on top cover dove on it, driving it away. 

Played the "Air Cover" card to drive off a Tatarian MiG. I didn't need to put a model J29 out, but it made for a nice picture.

She still had some rockets left and dove again on another nice target, some troop carriers and older T34s.

She fired her last rockets and switched to guns. Looking over her shoulder she was gratified to see a smoking troop carrier and a burning tank.

3rd strafing run

"Falcon Leader to Falcon Flight. Everyone dumped their load? Form up and let's go home." Then refuel, rearm and head back out. 

"Ma'am I think you just made history. First successful attack by the KML!"

"We made history. Now cut the chatter." But behind her mask, Gretchen was smiling.

MiG tries another run over the town.

**************************************

Pasha Dan wanted to try Seven Days, and I wanted to try some rules for ground attack and artillery, so he came over Friday night for a bigger, approximately 980 point game.

My rules for the aircraft are that they are bought like attack helicopters but don't add Command Tokens to your pool, but cost Command Tokens to activate.

Instead of standing off and firing ATGMs from a table edge at anything in LOS, they have to lay a template down, representing the strafing run of cannons and rockets fired from under wing pods. Anything under the template is attacked. 8+ to hit, Wpn Strength 4, 2d10 vs infantry and 2d6 to convert hits.

My template, a bit narrower than the wingspan and 11.5 inches long. Why 11.5 inches? Because that was the length of the cereal box card I had.

Defending AA assets can draw LOS from their position to where the aircraft model is placed to position the template. AA fire was treated exactly as in the rules as written.

Positioning the template to determine targets. Three T34/85s and two BTRs.

We both thought it added interest, without becoming overpowering. Of Dan's 3 attacks, only one was successful. That also prompted a discussion of how often aircraft should be able to be called on. Perhaps after making their run and leaving the table, they need to be rolled for in successive turns, causing a potential delay in returning to the fight.

My artillery rules didn't work so well. Got to rethink those.

Tuesday, July 8, 2025

Sky Aemyril -Rules for Airship Battles on the World of Alwyd

Had today off for reasons, so while waiting for the phone to ring, I cleared off my messy wargames table and unrolled my sea mat to try playtesting my airship battle game idea. I published the initial draft here. As you can see from the pictures I've gotten more ships painted this past week. This about half of them.

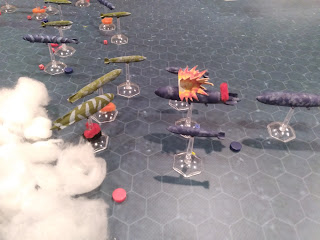
Royalist battleship emerges from cloud cover in Game 2 to fire a broadside into the Crusader heavy battleship

I decided that I had too many ships identified as Carriers in the first post, and thought that some, or most, could be battleships. So the ships previously identified as battleships have now become battlecruisers.

I also decided to add a "heavy" battleship. Yes, we could call it a dreadnought, but that seems very earthlike to me.

Class BB - Heavy Battleship 9 Damage Points, 6 heavy batteries, 3 light batteries SLOW 0-2 MEDIUM 3-4 FAST 5-6

Class BC - Battle Cruiser 7 Damage Points 4 heavy batteries 2 light batteries 1 rocket pod SLOW 0-4 MEDIUM 5-6 FAST 7-8

Royalist battles cruisers and cruisers

Crusader Cruiser squadron

Game 1. I rolled for where each fleet set up and they rolled for opposite short sides of the table.


I decided on a doubles initiative roll that a storm would arrive and move across the battle space like some alien horror from Original Star Trek.
Flanking cruiser squadrons veering to avoid the storm

Crusader Cruiser squadron is caught and thrown into disarray, with some minor damage suffered.


Even though they can't shoot as a unified formation now, they get some good hits, blowing up the Royalist heavy battleship.


Cruiser goes down from accumulated damage points


Royalist Battle Cruiser explodes!


Crusader Battleship explodes

So that was interesting. I was madly scribbling notes across my print out as I moved models and rolled dice. There were a few things missing, like a proper set up and weather. The complicated Formations weren't working, and I decided to just measure moves and shooting instead of using the hexes.

I decided to add proper set up, borrowed heavily from Nimitz.

  • Each side rolls a d6. Low Roll is Disadvantaged.
  • Disadvantaged Player starts with a 12"x12" box 12" in from the right hand corner of his table edge. He rolls a second dice. 1-2 adds a second 12x12 directly to the left along the table edge. 3-4 12x12 box adjacent to upper left corner. 5-6 12x12 box on the top of first square. He deploys his fleet inside these two boxes (yes, he can include the area between the corners if he rolled the diagonal boxes). The fleet is pointing in the direction from initial box to box rolled.
  • Advantaged Player then sets up anywhere on his half of the table.
  • Roll for weather.

Roll 2d6 for Weather after both fleets deploy.
1/1 Big Storm covers a 12"x6" area. Roll for where around the table it starts. Every turn it moves 2d6 towards the opposite table edge/corner. +1 on the damage roll for any ship caught by it.
1/2-5 a 6"x6" storm
2-5/2-5 2d6 3" clouds placed alternately around the table
1/6 12"x6" cloud bank roll for initial placement and moves 2d6 across table
2-5/6 6"x6" cloud bank
6/6 Clear Skies

After lunch I cleared things up and set up another game.

Game 2. 
Crusaders are the Disadvantaged Player and rolled 1-2 for Deployment. Then we got 2d6 clouds.

Clouds are placed alternately by the players.

For Activation I reached for the This Quar's War: Clash of Rhyflers card deck. 3x 3s, 4x 4s, 3x 5s. Draw first card and discard face down.

Advantaged Player gets first card. 1 Activation you can Move or Shoot a Formation or Single Ship. 
A Formation or Ship that has Moved can be Activated again to Shoot. But may only do each only once per card.
The black pipe cleaners are marking who has fired.

Ships can only move as a Formation if they are bow to stern in line with no more than 4" between posts. Ships in squadron may "follow the leader" to stay in Formation.

When you're a Squadron of Destroyers and find yourself going broadside to broadside with the enemy Battleship Squadron!

Your Destroyer only scores 2 hits, but you roll really well on the Damage

Boom! A fire is started on the Royalist Heavy Battleship which promptly explodes some ammunition! 


Later in the game the Royalist Destroyer Squadron repeats the performance. Close range Rocket salvos blowing up a Cruiser and a Battleship.

Still need to clarify maneuvering. But Nimitz's one 90 degree turn somewhere during the move seems OK.

Measuring from the posts and using the hex bases for firing arcs still seems to work though.

Friday, May 9, 2025

Birthday Trench Assault!


I took the day off to drink tea, eat bacon and play with my Quar. I had some ideas tootling around in my head and opted to use This Quar's War and do another playtest for the Zombiesmith design team. I also decided my Trench Raiders should see some dice rolled in anger and thought a raid to spike a big gun would be fun. The Crusader defense have a company plus two heavy shotguns garrisoning the trenches and bunkers. But they're all asleep in their nests, and need to get into positions.

The Coftyrans are attacking from the trees on the right. In addition to the Trench Raider detachment, there is a company of 3 squads, plus an M3b HMG team and an RCO field gun to make a diversionary attack.

Table set up. There's a squad and an H11 team in each bunker, an HSG in each gun pit in front. The other two squads are in the dug outs in the forward trench line. The gun that the Trench Raiders are trying to blow up is in the left hand trench line.

Sniper and pair of Cryfen LMGs provide overwatch for the Raiders 

Trench Raiders move out

Diversionary attack in their assault waves

M3b HMG team 

RCO field gun 

Cold sentry

Sentry

Standing guard in the battery

Coftyrans get the first card. How far they get (how many activations the card gives them) is the random element before the alarm is raised. Using Group Moves, the Trench Raiders moved three bounds, being slowed crossing the wire, and the Rhyflers got two moving up to the bunker and road block. 

Fortunately, they drew a 5.


Combat Activations can't use group moves, so one squad was sent forward to assault, quickly overwhelming the lone sentry. 


They then assaulted the bunker behind. The Crusaders by this time were trying to mobilize, needing an Activation to deploy each squad or team. In hindsight, I should have put the Bomber Squad up front to take the bunker.


In the trenches I had the squads and HSG teams deploy from the two dugouts causing more delays. But the sentries in the weapons pits could fire the HSGs with half dice until the rest of the crew got there.

Alert! Stand to! Stand to!


Trench Raiders slip past the forward Trench.

The Trench Raiders got into the Crusader rear and were moving up on the big bunker when it's garrison started waking up.

Trying to get up close before the garrison wakes up

I should have brought the Support group (two Cryfen LMGs and the Sniper) along with, they would have been more useful firing on the bunker from the orchard.

Just close enough for everyone to count for Close Combat. But two Raiders have been cut down by the alerted H11 in the bunker.


Both sides taking casualties in close quarters fighting. Trench Raider's Doru SMGs and grenades giving an edge (I gave them the Brawler advantage, rerolling any missed dice)

After about 4 rounds of combat, the Raider detachment retires with only 3 quar left and 4 shock. The bunker Garrison has 8 shock and 7 figures left.

Meanwhile, on the other side of the table, the Rhyflers were trying to assault the other bunker. They started out getting a slight edge; the side with the least shock gets "the Lead" and adds an extra die per figure.

But eventually the defense had a good roll or two and killed several attackers, resulting in them now having twice as much shock as figures left.

In hindsight, I should have brought the LMG team (in the slit trench) up with the assault team to add some dice to the attack. They were just a smidge too far back to help.


Trying to assault the bunker at the roadblock 

Assaulting squad breaks with double shock

I also sent a squad to attack the HSG nest that was firing into the flank of the diversionary assault.

A second squad tries rushing the HSG nest.

Yeah, that didn't go well 

More hindsight: I should have put everyone prone while the RCO and M3b put some fire on the HSG nest before rushing the squad up. Live and learn I guess? But with the card activation, and everything getting snarly once the shooting starts, you just don't have enough activations to do everything you want. Of course, neither does the other side.

But with the Trench Raiders retiring and the supporting Rhyfler company having two out of three squads shattered, it was time to call off the attack.

I struggled with the Close Combat rules as written, but was able to give some useful (I hope) feedback. It turns out my biggest idea (using reduced firepower dice) was very similar to one Joshua already had. Great minds and all that.

My indulgent birthday lunch. Toasted cheese bun, with fried egg, cheese slice, and crispy bacon with one of several mugs of tea.

All in all, a good day was had.